Recovered from ShadowRiders.net Forum a sticky post by gochisox81 August 18th 2012:
4 Degree Timing Mod and Replacing Clutch Springs VLX
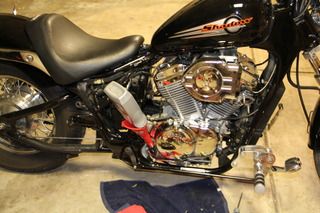
I will be demonstrating how to change out the clutch springs and perform the 4˚ timing mod on my 2003 Honda Shadow VLX. This job is very similar for all models of the VLX and could probably be used as a guide to replacing the springs on most Honda clutches. McV has a write up specifically for the 750 that I used as a basis to do the same to the VT600CD.
***DISCLAIMER: I am NOT a mechanic. I have NO FORMAL TRAINING to work on motorcycles, or any engine of any sort. Perform this task at your own risk.***
That being said these jobs are such that a novice would have difficulty screwing them up. They are best done when you have to change the oil since you will need to drain it anyway.
I have to give credit to McV, without his write up in the 750 Mods, I wouldn’t have been able to do this nearly as confidently.
What you will need:
2.5 qts Oil of your choice
1 oil filter
1 oil filter wrench
Socket set and ratchet
Flat head screwdriver
Black Liquid gasket
Choice of new springs
Brake cleaner
Rotary grinding tool
Grinding wheel
Pointed Carbide or Stone tool
Feeler guage
New gasket (some older models)
Approx. 3hrs
2-3 cold beers(your choice)
Getting Started:
Step 1:
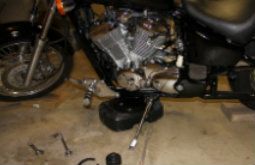
Remove the entire exhaust system if stock, or just the lower pipe if possible with an aftermarket system.

Step 2:
Drain oil and change oil filter, it is ok to put the plug back in after draining , but DO NOT REFILL THE OIL!!!
Step 3:
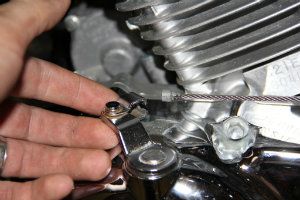
Release the clutch cable from the mount and set to the side so it’s out of the way.
Step 4A:
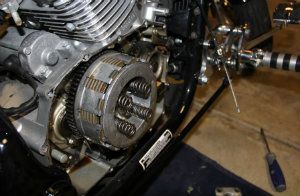
Take out all 14 bolts holding the cover on, and gently pry the lid using minimal pressure needed. All you are doing is breaking a seal, and once it is broken the cover comes off quickly. Pull the cover straight back to remove. This is where if you chose not to remove the exhaust it can get tricky. You cannot tilt the cover since there is a guide bar at both ends.
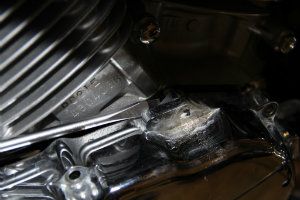
Once removed you should see something like this:
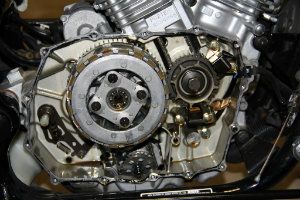
Step 4B:
Remove the 4 bolts holding the clutch plate by backing them slowly out a little at a time. REMEMBER they are under pressure and its best to back one bolt out a little bit and then move to the others to match movement so that the clutch plate doesn’t bend or tilt too much. Don’t worry about a sudden release however, the bolts are longer than the springs.

Remove the old springs and replace with new springs.
Replace the clutch plate tightening the plate down with a torque wrench to 9lbs
Step 5:
ONTO THE TIMING MOD:
Carefully note the distance between the magnets and the wheel using a feeler gauge. If you need it to line up better, with a good amount of force you can usually get the clutch to spin counter clockwise by firmly grabbing it with both hands and twisting. I’m sure there is other ways, but this worked well for me.

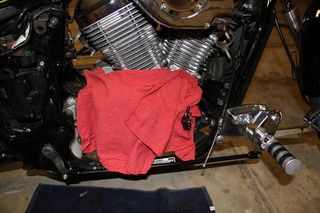
Remove the top magnet sensor and COVER THE CASE so that no debris gets in while grinding.
Using the rotary too and grinding wheel, grind off the ridges on back until you have a flat smooth area.
The goal here is to move the sensor approximately 4˚ counter clockwise for a slightly faster timing. Keeping this in mind, grind the holes so that it will allow the sensor to be moved that way while still leaving plenty of strength to hold the sensors on. This is really where you can make your only mistake by grinding the wrong side of the hole, and even that isn’t a complete disaster.
I was unable to get a clear picture of this, so this will have to do.
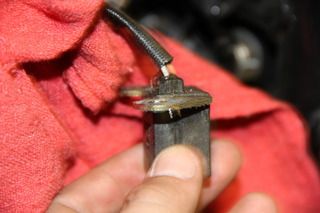
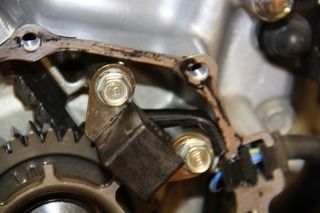
THOROUGHLY clean the sensor and replace the sensor carefully noting the distance between the sensor and the wheel so that it is as close to the same original distance as possible. I cannot stress enough to clean this well. It is a magnet and as you can see from my pictures, it will collect a lot of the shavings. Whatever you don’t clean will end up in your engine. I also recommend doing another oil change before 2000 miles after this mod in assumption shavings will get in.
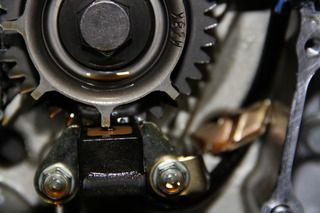
Picture of upper sensor installed. Note the original position by the mark on the metal.
REPEAT THIS PROCESS ON LOWER SENSOR.
First remove the right bolt and take out the wire harness that holds the wires out of the way.
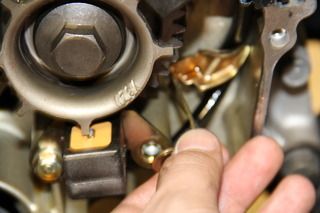
Grind down the raised backs and drill out the openings to allow the sensor to slide counter clockwise. CLEAN and replace wire harness and sensor making sure to keep the sensor at the same distance from the wheel as before you removed it and pushed as far counterclockwise as your cuts will allow.
Step 6:
FINISHING UP!
Clean off the remaining old gasket using a non-residue forming cleaner like a brake cleaner sprayed onto a shop rag.
Place a small bead of black liquid gasket around the rim circling the bolt holes, and replace cover. Some earlier models will have an actual gasket you will need to use. It is recommended to replace this gasket when doing this job instead of reusing the old one.
Proceed to tighten all 14 bolts until the gasket starts to ooze out the sides. Make sure you have full coverage around the entire case. Wait 1 hour and tighten the bolts the rest of the way. (the wait is highly opinionated. I only give it to you since that’s what the directions on the back of the gasket bottle says. Most don’t wait from what I hear.)
Refill with oil of your choice:
Replace the exhaust and the clutch cable and adjust as needed so that it feels right.
That’s it you’re ready to go. Enjoy! You should feel a bit better throttle response and a peppier feel because of the 4˚ modification, and less slippage when shifting in the high gears while really giving it the throttle with the new clutch springs.
Let me know what your results are.
User Review From Forum:
Just got back from the ride. You can def feel the faster throttle response. It seems like it runs a bit smoother and is def faster to react to the throttle. Found myself cracking the throttle just for kicks. Was well worth the time and effort.